
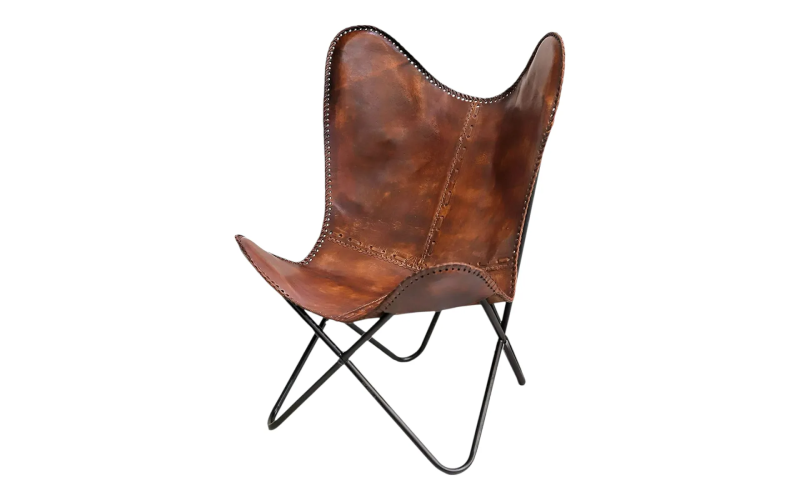
Restoring an old leather butterfly chair starts with careful cleaning to remove dust and dirt using a soft brush. Gently wiping the leather with a mild cleaner (not too wet) helps avoid damage. Adjusting the leather’s pH by lightly applying a vinegar-water mix strengthens it, while conditioning brittle spots with licker oil softens hardened areas. Small cracks can be fixed using leather primer and flexible fillers, and holes may need patches glued underneath for support before filling on top. After repairs, applying an antique finish refreshes color and shine. Lastly, regular conditioning keeps the leather supple and protected from drying out over time.
Preparing and Cleaning the Leather Surface
Start by gently removing surface dirt using a soft leather cleaning brush or a gentle bristle brush. This helps avoid scratching the leather and clears away dust and loose debris. Next, lightly dampen a clean cloth with a mild leather cleaner or a rapid leather & vinyl cleaner and carefully wipe the leather surface. Be cautious not to soak the leather, as too much moisture can cause damage or discoloration, especially on older leather. After the initial cleaning, prepare a solution of 50% vinegar essence (25% solution) mixed with 50% water and gently wipe the leather to help adjust its pH balance and improve durability. Inspect the chair for any ornamental nails or tacks; if you need to access the underside for upholstery or glue work, carefully lift these without causing damage. For areas where the leather feels hardened or brittle, apply a mixture of 20% licker oil and 80% warm water, letting it absorb fully before repeating 2 to 3 times as needed to soften the material. Once the oil treatment is complete, allow the leather to dry naturally away from direct heat or sunlight. To prevent any sticky residue or dirt attraction from leftover oils, use a leather degreaser to clean the surface afterward. It’s important to test all cleaning and conditioning products on a small hidden spot first to ensure there are no color changes or adverse reactions. Lastly, work in a well-ventilated space and wear gloves to protect your skin from prolonged contact with cleaning agents.

Softening and Conditioning Hardened Leather
To soften brittle leather on your old butterfly chair, start by mixing 20% licker oil with 80% warm water to create a gentle softening solution. Using a sponge or a soft cloth, apply this mixture evenly over the hardened patches, making sure the leather absorbs it fully without soaking it. Repeat this process 2 to 3 times, allowing the leather to retract and absorb the oils between each application. Be careful not to over-saturate the leather, as too much moisture can weaken or stretch the fibers, which may cause further damage. After softening, use a leather degreaser to remove any excess oil that could attract dirt or leave the surface sticky. Let the leather rest for several hours or overnight to regain its natural suppleness. Once softened, consider applying a leather conditioner designed for vintage or delicate leather to maintain a balanced moisture level, but avoid conditioning areas with structural damage until those repairs are done. Keep the chair away from heat sources during this process to prevent drying or cracking. It’s helpful to check the softened areas regularly for any changes in texture or color, so you can monitor how the leather is responding to your treatment.
Fixing Cracks, Rips, and Holes
Before starting any repairs, clean and degrease the damaged area thoroughly to ensure adhesives and fillers stick properly. Apply a sticky leather primer over the cracks, rips, or holes; this helps repair materials bond better to the leather surface. For small cracks, use a flexible leather filler made specifically for leather and vinyl to fill gaps smoothly. When dealing with larger rips, reinforce the tear by gluing a thin patch of leather or sturdy fabric on the underside of the damaged area. Use leather glue to secure the patch and smooth out any wrinkles or bubbles. After the patch is set, fill surface cracks or gaps with filler and sand gently once dry to create a smooth finish. For holes, cut a matching piece of vegetable-tanned leather slightly larger than the damaged spot. Glue a thin backing cloth or resistant fabric underneath the hole first to provide support, then glue the leather patch on top. If the patch is lighter than the chair’s leather, pre-color it to blend in more naturally. Allow all glues and fillers to dry completely before moving on to color restoration or finishing steps.
Stabilizing Brittle and Scaly Areas
After cleaning and degreasing brittle or scaly patches on your leather butterfly chair, apply a leather binder to strengthen the weakened fibers. This binder helps prevent further flaking and cracking by forming a stable layer on the surface. Once the binder has dried, gently smooth the area using a fine sanding pad to remove roughness without causing damage. If needed, repeat the binder application to build up enough support for the fragile leather. Avoid using heavy fillers on these brittle spots before stabilization, as that can lead to more harm rather than repair. Work slowly and carefully throughout, since brittle leather is prone to tearing when handled roughly. Before applying the binder extensively, test it on a small hidden area to ensure it does not cause unwanted discoloration or stiffness. After treatment, keep the stabilized leather away from excessive moisture and direct sunlight to help maintain its condition. If the brittleness is severe, it’s wise to seek professional advice before proceeding further. Use soft tools only, steering clear of sharp instruments near fragile patches to prevent accidental cuts. It’s also helpful to document the state of these areas before and after treatment to track your restoration progress effectively.
Refreshing Leather Color with Antique Finish
To refresh the color of your old leather butterfly chair, start by selecting an antique finish leather dye or color restorer that closely matches the original leather tone or the look you want to achieve. Before applying, test the product on a hidden spot to check for color match and absorption. Lightly sand any rough or patched areas with fine sanding pads to create a smooth surface and improve primer adhesion. Use a leather primer on these spots to help the color adhere better. When applying the antique finish, use a sponge or soft cloth with gentle circular motions to mimic the leather’s natural grain and texture. Build up the color gradually with several thin layers rather than one heavy coat, letting each layer dry fully before adding the next. This approach prevents streaks and uneven patches. Be careful not to over-apply color on flexible areas, as too much dye can reduce suppleness and cause cracking over time. Once you’ve achieved a uniform appearance, wipe the leather gently with a clean cloth to remove any excess dye or residue. While the finish cures, keep the chair in a dust-free area to avoid particles sticking to the surface. This method helps restore the leather’s rich color while preserving its natural look and flexibility.
Applying Final Leather Conditioning
Choose a high-quality leather conditioner designed specifically for vintage or delicate leather to avoid damaging the old material. Using a soft cloth, apply the conditioner evenly across the entire leather surface with gentle, smooth strokes. Pay special attention to spots that tend to dry out or have shown signs of past damage, as these areas benefit most from restored moisture and flexibility. Be careful not to overapply; the leather should have a slight sheen without feeling greasy or saturated. Let the conditioner soak into the leather naturally, ideally leaving it to absorb overnight or for several hours. After absorption, lightly buff the leather with a clean, soft cloth to bring out its natural shine and remove any leftover conditioner. To keep the leather supple and prevent cracking or brittleness, repeat this conditioning process every six months. Once conditioned, place the chair away from direct sunlight and heat sources to help maintain the treatment’s effectiveness. Avoid household oils or waxes, since these can block leather pores and reduce breathability. Between conditioning sessions, keep the leather clean and free of dust to support its long-term health and appearance.
Care Tips for Long-Lasting Leather Butterfly Chairs
To keep your leather butterfly chair looking good and lasting longer, avoid placing it in direct sunlight or near heat sources, as these can dry out and fade the leather. Handle the chair gently when moving or folding the sling seat to prevent scratches and tears. If possible, rotate and flip the sling seat regularly to ensure even wear across the leather surface. Clean up spills right away using a soft, dry cloth to stop stains and moisture damage from setting in. Steer clear of harsh chemicals or abrasive cleaners that can strip natural oils and weaken the leather over time. Regularly dust the leather with a dry, soft cloth or brush to keep dirt from settling into the grain. For deep cleaning and conditioning, it’s a good idea to have professionals treat the chair every few years. When storing the chair for long periods, use furniture covers to protect it from dust and environmental harm. Check the stitching and hardware now and then to catch any loosening or damage early. Finally, avoid placing heavy or sharp objects on the leather sling to prevent dents or punctures that can be tough to fix.
- Keep the chair out of direct sunlight and away from heat sources to prevent fading and drying of the leather.
- Handle the chair gently to avoid scratches and tears, especially when moving or folding the sling seat.
- Regularly rotate and flip the sling seat if possible to distribute wear evenly across the leather surface.
- Clean spills immediately with a soft, dry cloth to prevent stains and moisture damage.
- Avoid using harsh chemicals or abrasive cleaners that can strip leather oils and cause deterioration.
- Dust the leather regularly with a dry, soft cloth or brush to keep dirt from embedding in the grain.
- Consider professional deep cleaning and conditioning every few years for thorough maintenance.
- Use furniture covers if storing the chair for long periods to protect from dust and environmental damage.
- Inspect stitching and hardware periodically to catch any loosening or damage early.
- Avoid placing heavy or sharp objects on the leather sling to prevent indentations or punctures.
Essential Tools and Products for Restoration
Restoring an old leather butterfly chair requires a careful selection of tools and products to handle the delicate nature of aged leather. Start with a soft leather cleaning brush to gently lift surface dirt without scratching or damaging the leather. For cleaning, use a mild leather cleaner or a rapid leather & vinyl cleaner to avoid harsh chemicals that might dry out old leather. After cleaning, applying a diluted vinegar essence (25% solution) helps adjust the leather’s pH, improving its durability and resistance to future wear. When dealing with hardened or brittle leather, licker oil or a specialized leather softener is essential to soften and rehydrate the material. However, excess oils can attract dirt, so a leather degreaser is necessary afterward to remove residues and prepare the surface for repairs. For damaged areas, a leather primer enhances the adhesion of fillers and adhesives. Flexible leather fillers are designed to fill cracks, rips, and holes, restoring smoothness without cracking as the leather moves. Leather glue is vital for securely attaching patches or reinforcing tears, often combined with thin leather patches or backing cloths to support fragile areas from underneath. For brittle or scaly surfaces, a leather binder stabilizes the material before further repair or finishing steps. To smooth repaired sections or rough spots, fine grit sanding pads work without harming the leather grain. Finally, an antique finish leather dye or color restorer refreshes and evens out the leather’s appearance, while a leather preserver or conditioner nourishes and protects the surface, extending the life of your restoration. Having these tools and products on hand ensures each stage of the restoration process is handled properly, preserving the chair’s character and functionality.
Frequently Asked Questions
1. What are the first steps I should take before restoring an old leather butterfly chair?
Start by cleaning the leather gently with a mild leather cleaner or a damp cloth to remove surface dirt. Inspect the chair for any cracks, tears, or areas where the leather is worn thin. Removing dust and grime first helps you see what repairs are needed and prevents further damage during restoration.
2. How can I fix cracks or minor tears in the leather without making them worse?
Use a leather repair kit that includes a filler designed for cracks and tears. Clean the area thoroughly, apply the filler in thin layers, and let each layer dry before adding another. Avoid using household glues, as they can cause stiffness or discoloration in the leather.
3. What type of conditioner should I use to restore softness and prevent future cracking?
Pick a leather conditioner made specifically for your type of leather—typically an aniline or semi-aniline conditioner if it’s natural leather. Apply it sparingly and evenly, allowing the leather to absorb it fully over time. This nourishes the leather and helps maintain its flexibility.
4. Is it necessary to reseal or protect the leather after restoring it?
Yes, applying a leather protector or sealant helps shield the chair from moisture, stains, and UV damage after restoration. Look for a product that doesn’t alter the leather’s finish or color significantly and reapply as recommended to keep the chair in good condition.
5. How should I care for my restored leather butterfly chair to keep it looking good for years?
Keep the chair out of direct sunlight and away from heat sources to prevent drying and fading. Clean it regularly with a soft cloth and condition it every few months. Avoid harsh chemicals or abrasive cleaning tools, and address spills promptly to prevent stains from setting in.
TL;DR Restoring an old leather butterfly chair involves gently cleaning and conditioning the leather to soften hardened areas, repairing cracks, rips, and holes with appropriate fillers and patches, and stabilizing brittle surfaces. After repairs, refreshing the color with an antique finish and applying a final leather conditioner helps protect and maintain the chair. Regular care like avoiding direct sunlight, moisture, and sharp objects will keep the leather looking good over time. Using the right tools and products makes the process smoother and preserves the chair’s vintage charm.
